BACK-UP DATABASES ON ORIGINAL SERVER
This topic covers how to back up and move the System Galaxy and idProducer databases on the original server.

VERIFY MAINTENANCE AGREEMENT IS VALID
-
Before you make backups, make sure System Galaxy product Maintenance Agreement is valid (not expired).
-
From the System Galaxy menu, go to Configure > Options > Registrations > System.
-
If the Maintenance Agreement is expired, you must contact authorized customer support to update the maintenance agreement.
-
Once the Maintenance Agreement is valid, you can proceed.
-
STOP ALL CLIENT CONNECTIONS TO ORIGINAL SERVER
-
On the original server, close all client connections as follows …
-
Close all instances of System Galaxy software that is running on any/all client computers.
-
Close all instances of idProducer software (web clients) that is running on any/all computers.
-
Quit all idProducer Print Dispatchers on all clients.
Do this by opening the Task-tray and right-clicking the Print Dispatcher Icon,
then selecting Quit application from the shortcut menu (shown below). -
Stop the idProducer Connector services on all client computers from the Windows® Services screen.
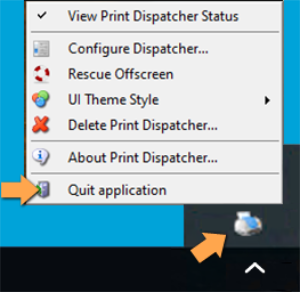
Print Dispatcher Task Menu
-
STOP & DISABLE ALL GALAXY SERVICES ON THE ORIGINAL SERVER
REQUIREMENTS ...
-
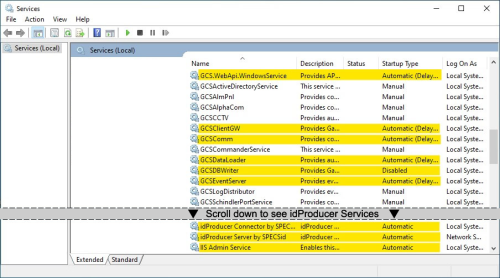
On the original server, you must stop and disable the following services ...
|
* Must be stopped on every client workstation. |
-
Open the Services window by typing “Services” into the Search field of the Windows Taskbar.
-
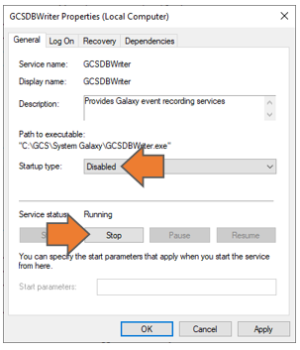
Double-click on the name of the service to open the Properties screen.
-
Click the Stop button in the Properties screen.
-
Select the “Disabled” option from the Start Type droplist.
-
Click the Apply button.
-
Click OK to close the Properties screen. (make sure you do this for all the services listed)
BACK UP THE DATABASES ON ORIGINAL SERVER
-
Open the GCS Service Manger from the System Galaxy folder: c:\GCS\System Galaxy\Utilities
-
Right-click on GCSServiceManager.exe and choose “Run as Administrator” from the menu.
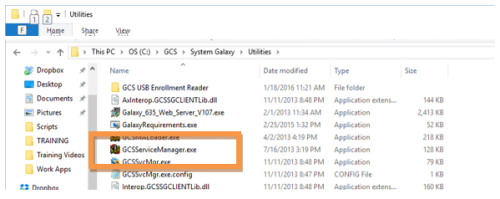
C:\GCS\System Galaxy\Utilities > GCS Service Manager.exe
-
In the GCS Service Manager tool …
-
Select (highlight) “MSSQL$GCSSQLEXPRESS“ service at the bottom of the list.
-
Click the [Configure SQL Backup] button, to open the backup screen.
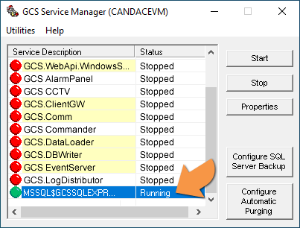
GCS Service Manager > MSSQL Service selected.
-
-
In the Configure SQL Server Backup screen, do the following steps …
-
Assign the desired backup path using the Browse […] button to select the appropriate folder.
-
(GCS Default path) c:\GCS\System Galaxy\Utilities\DBBackup
-
-
Enteryour sa login credentials (sa & password)
-
Select(check) all the database checkboxes (SysGal, SysGalArc and idProducer).
-
Clickthe [Run/Test Backup] button to generate the backup files.
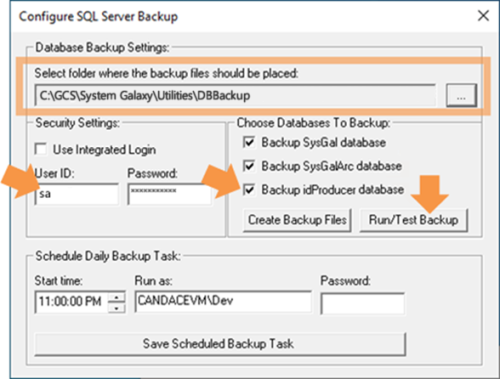
GCS Service Manager > Configure SQL Backup screen
-
-
The “SGBackupResults.txt” should automatically open in Notepad.

Run/Test Backup > SG Backup Results text file
-
Windows Explorer auto-opens to the backup folder path that was designated in the Configure SQL Backup screen.
RESULTS: The database .bak files and Backup Result files will be shown.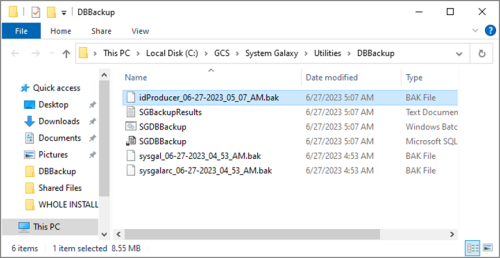
RunTest Backup > Time-stamped Database Backup files
-
Move all backup files to an accessible location on the new server.
-
idProducer database
-
SysGal & SysGalArc databases
-
And all system assets
-
-
Close all screens that were opened by the backup process.
-
This completes the steps to backup files on the original server. Proceed to the next section
.